Step-by-step mesh generation example
This section briefly shows how to create a mesh with example data. We are using the polygonal description of a part of River Severn in the United Kingdom, close to Upton Severn city.
The desired mesh deliverable corresponds to a quality, mixed-elements mesh designed for flood simulations in which quadrangles will cover the river space and triangles occupy laterally connected zones. The data consists of a central polygon that maps the river section where a smooth curvilinear quadrangular mesh is wanted. Three additional polygons plug to the sides of the river polygon, defining riverside flood plains where triangulation is performed.
To download the dataset, log in to MB, click ![]() at the top right and select
at the top right and select  .
.
A file of 17.5 MB will be downloaded to the default folder on your computer. This file contains 3 sets of example data, of which we will be using only River Severn. You are free to try the other data sets to practice further.
You will need to create a project in the MIKE Data Admin application, and upload the example files, as per the instructions in chapter 3.2.1. You can then continue from the MB:
- Selecting the Project
Select the Project you have created from the Severn River data - Creating a Workspace
Select all data records and create a Workspace Triangular meshing**
As a preliminary meshing event, a pure triangulation is performed. In order to better constrain the triangulation in the river polygon, its centreline is calculated in a pre-meshing step. The obtained polylines record is then added to the list of geometries to be meshed:- Enter the geometry panel of “River” (see Section 0)
- Create its medial-axis by drawing a polyline (see Section 3.4)
- Go back to the main page and create a new mesh (see Section 3.7)
- Select all geometries, including the newly created medial axis
- Generate the mesh (thus using default parameters)
- Analysing the mesh
- Enter the generated mesh panel (see Section 3.7.5)
- Visualize its quality metrics
- You may want to perform queries and launch post-operations like mesh smoothing (see Section 3.8.1)
- You may also want to change the default settings and do remeshing
- Creating a mixed triangular / quadrangular mesh
- Enter the triangular mesh object and duplicate it (see Section 3.4.4)
- Exit the mesh object panel and enter the duplicated one
- Go to Configuration tab and click “Edit configuration” button
- Change the river polygon mesher to “Quadrangulate” (see Section 3.7.1)
- Change default number of rows and columns if wanted
- Regenerate the mesh
- **Saving meshes
- Follow Section 3.9 to export one or more meshes
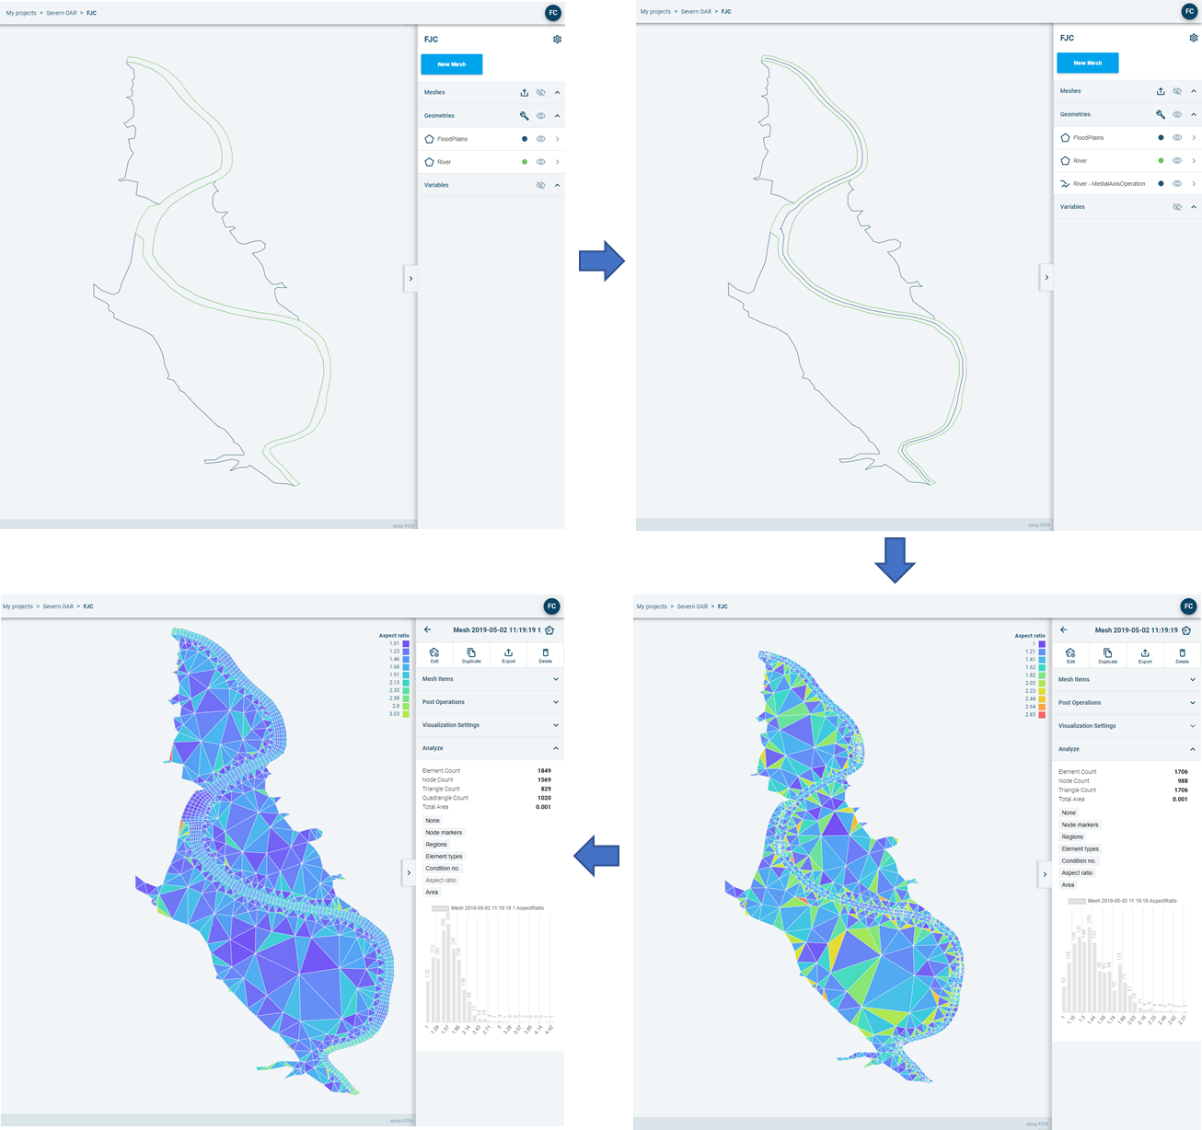
Figure 4‑1 Generating two variants of a mesh step by step.