Using the Workspace
Using the Workspace
The workspace in MB holds most of the functionality. This guide will first describe the layout of the page, then go in depth about the functionality.
Layout
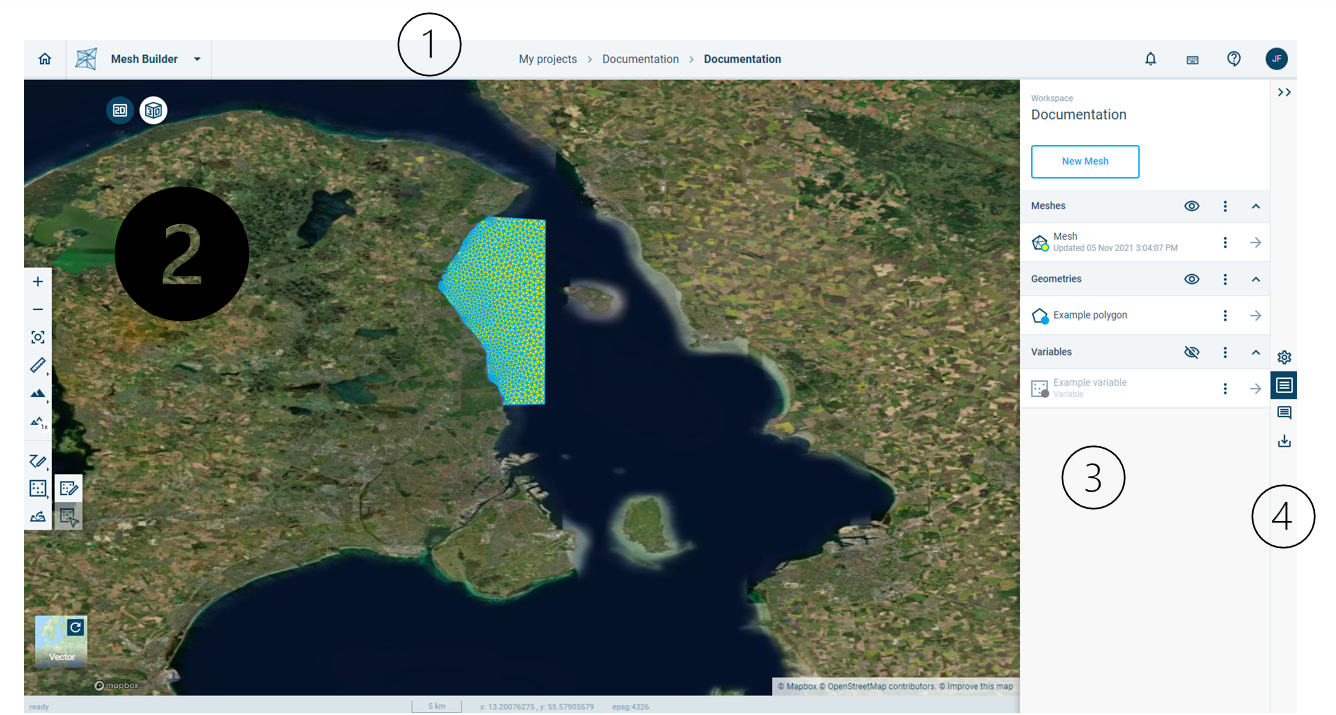
Figure 3‑8 The Workspace page with its basic elements and with default plan view of the available geometries.
Figure 3.8 shows the 4 main elements of the Workspace page:
- Top bar
- Map area
- Data panel
Navigation toolbar
Top bar
- On the left is a quick switch to the other Cloud applications you have access to. If you select an application from the list, it will open the application in the project you are currently working in in Mesh Builder.
- In the middle of that is the navigation to get back to the Projects and recent workspaces page (My projects) and the workspaces in the current project (displays the name of the current project). To the right of that are five buttons:
- notifications will be shown here
- view the keyboard shortcuts that can be used in the map area
- find the user guide, example data or send an e-mail to support
- A button to the right with your initials. Click it to find a button to Log out
Map area
The second, below the top bar, on the left, is the map area. There are several buttons here, as well as a toolbar. The toolbar will change, based on what you have selected, to support actions that you can take.
 switch between 2D and 3D view. The active one is the one in dark blue.
 Zoom in
 Zoom out
 Reset view
 Measurement tool (choose to measure between to points or an area)
 Choose 3D terrain
 Choose the zoom ratio (2x, 5x, 10x, 25x, 50x)
 Draw geometry (Draw rectangle, Draw circle, Draw polygon, Draw polyline, Draw point)
 Draw Variable (Draw variable, Edit variable)
Extract features from open data sources
 View info on extracted Landuse tool (only available after extracting Landuse or when editing a shape).
It is also possible to change the map used in the background. This can be done by clicking the button on the bottom right. It indicates the option you will get it (No Basemap, Mapbox Sattelite, Vector):

Data panel
The third major component, to the right of the map area, is a panel with all data saved in the workspace, including Meshes, Geometries and Variables.
Above the data panel, there is a display of the workspace name along with a context menu just above the name. The context menu provides access to three options:
- Operations: This option provides access to different options for creating a polygon that can be used to define an outer boundary (domain) for meshing.
- Send snapshot to support: This will create a “snapshot” of a workspace and save it in folder that is accessible to the DHI support team. A snapshot is a version of workspace that can be saved and restored later. Sending a snapshot to support enables the support team to reproduce issues reported in support cases. If a bug is found, the snapshot also enables the team to debug and test solutions.
Create workspace snapshot: This will create a “snapshot” of a workspace and save it in the same folder as the workspace. A snapshot is a version of workspace that can be saved and restored later. This option is useful for saving one’s work if, for example, one would like to pause a subscription to Mesh Builder.
Below the workspace title, data are organized under the headings Meshes, Geometries, and Variables. If one clicks on the title of a data set, you enter the properties of the selected data set, which are then displayed in the panel. Otherwise, the following icons are visible:
 Hide all items of this type on the map (hidden items will not be loaded upon loading of the workspace, only when interacted with such as clicking or using them in an operation)
 Show all items of this type on the map
 Open the context menu for an item (or a group of items when it is in the header). Properties can also be accessed through the context menu.
 Collapse this section
 Unfold this section
 Go inside this item
Navigation toolbar
The fourth and last component, on the uttermost right side, is a navigation toolbar:
 Collapse the panel. Clicking any of the other buttons in this toolbar unhides the panel menu if it is hidden.
 Edit Workspace settings
Go to the overview of Meshes, Geometries and Variables
 Go to the Comments panel
 Go to the Export panel
Editing a Workspace
The Edit Workspace settings panel is used to copy geometries and variables from Cloud Adminto the Mesh Builder. It is also possible to change the Workspace name and its description.
Click the “Edit Workspace settings” button (![]() ) in the right navigation panel.
) in the right navigation panel.

The Name and Description fields can be used to edit the workspace name and, optionally, add a workspace description.
The Copy from Platform button is used to select data from Cloud Admin to copy to the Mesh Builder workspace. Datasets are copied from Cloud Admin; in other words, changes to data in the Mesh Builder do not affect the original data saved in Cloud Admin. After selecting data to copy, the user is prompted to specify whether each data set to be copied is a mesh, geometry, or variable. More information about meshes, geometries, and variables is given below.
A delete button is available for deleting a workspace. It’s also possible to turn on the coordinate grid for the workspace projection.