Mesh and Bathymetry
The Mesh & bathymetry step is used for uploading user inputs towards the generation of an assisted mesh. If the user uploads their own mesh, then this step is not available.
The inputs panel for the Mesh & bathymetry step is shown below. The inputs panel show the required inputs from top to bottom.
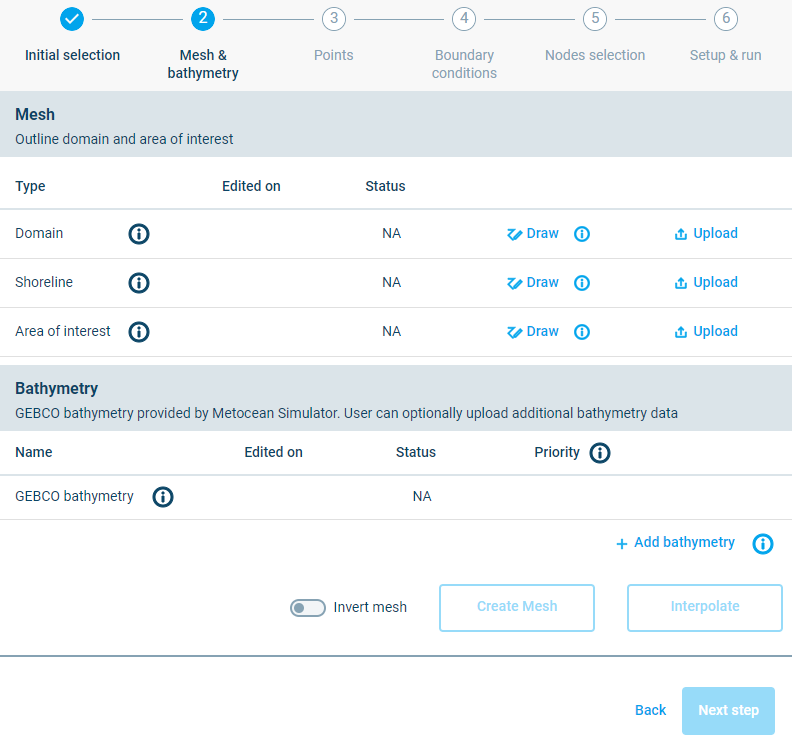
Inputs panel for the Mesh & bathymetry step.
The Mesh and bathymetry step consists of the following tasks, which are described in more detail in the sub sections below:
- Outline domain
- Define shoreline
- Define area of interest
- Upload bathymetry (optional)
Upload bathymetry
By default, GEBCO bathymetry is provided by MIKE MS via MIKE DataLink. The user has the option to upload additional bathymetry in the form of a space separated .xyz file.
An example format for the bathymetry data is provided below. This text can be copied to a text file and saved as fake_bathymetry_data.xyz:
-8.507639 54.577773 -50.00
-8.504510 54.578484 -50.00
-8.503373 54.575213 -50.00
-8.507212 54.573648 -50.00
The bathymetry xyz file can be uploaded from the desktop by clicking the button under the Bathymetry subsection:

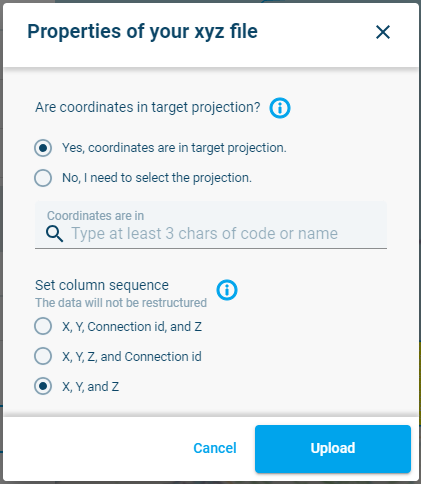
The properties of the xyz file need to be provided during upload.

Bathymetry data points shown in the interface (using Fake_bathymetry_data.xyz).
The uploaded bathymetry will be prioritised by default, but it can be moved up and down the priority list by the user. The highest priority data will be used for interpolation of the mesh while any other lower priority data will be ignored where it is overlapped by the higher priority data.
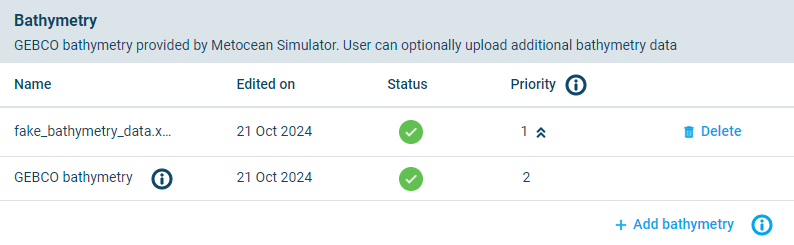
Prioritisation of bathymetry data.
Outline domain
The domain can be created either by drawing in the map or by uploading. Uploading can be done from the desktop or from Cloud Admin.

In this example a domain will be hand drawn on the map by taking the following steps:
-
Under the Mesh header which is shown on the left, go to the Domain section and click on the
 button:
-
Click the offshore boundary of the model, passing onto land to enclose the full marine area as well as the land behind the shoreline to be modelled.
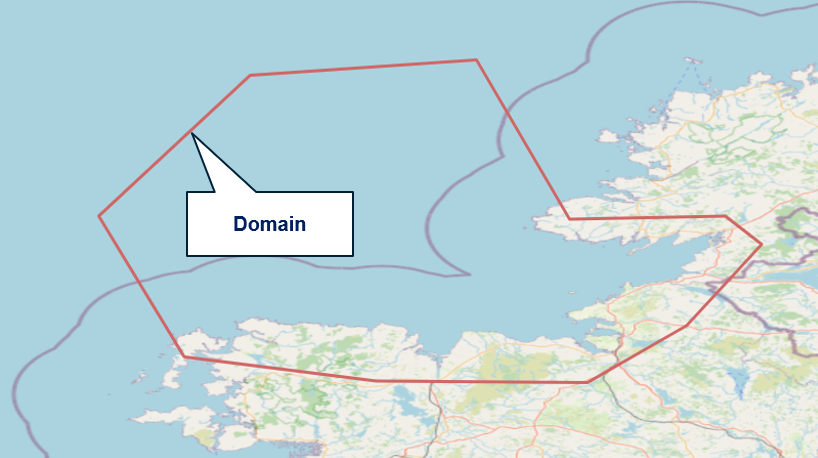
*Definition of the model domain by hand drawing on the map. The domain outline defines the offshore boundary and encloses the land behind the shoreline to be modelled.
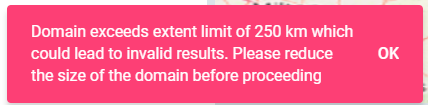
WARNING: MIKE MS will provide a pop-up warning message if the horizontal or vertical dimensions exceed 250km. The user will be requested to reduce the domain size before the mesh can be created.
WARNING: MIKE MS will provide a pop-up message if the offshore boundary is too close to land, and thereby not being able to extract boundary conditions from the DHI data providers. The user can still select to proceed if they choose to provide their own boundary conditions.
-
If required, the domain can be deleted, after which a new domain can be created.

-
The density of the mesh in the domain can be set by specifying a number of density points in the domain. Click on
 and adjust the default number of density points from 3000 to 6000 and submit the change. More information about the density points can be found under the info
  button.
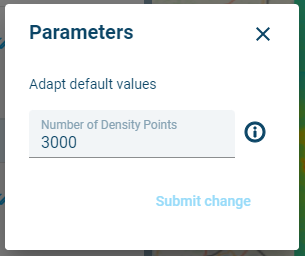
NOTE: As soon as the domain is created, MIKE MS will start to extract GEBCO bathymetry data which covers the full domain.
After extraction of the GEBCO data, it is displayed on the map. The GEBCO data can be hidden by opening the Layers panel on the top right and turning off the visibility of the GEBCO bathymetry layer.

GEBCO Bathymetry data. The GEBCO bathymetry data layer can be made invisible using the layers panel on the right.
Turned off GEBCO bathymetry layer:

Define shoreline
The shoreline can be created using similar steps as for creating the domain.
In this example a shoreline will be hand drawn on the map by taking the following steps
- Go to the Shoreline section on the left and click on the
 button
 - Start by clicking outside of the domain
- Keep clicking shoreline points along the shoreline
- End the shoreline outside of the domain by double clicking

Definition of the model shoreline by hand drawing on the map. The shoreline must start and end outside the domain.
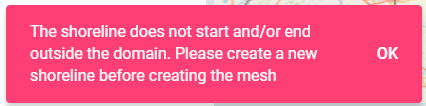
WARNING: MIKE MS will provide a pop-up warning message if the shoreline starts or ends inside the domain. The user will be requested to redo the shoreline before the mesh can be created.
- If required, the shoreline can be deleted, after which a new shoreline can be uploaded or created.
Define area of interest
The area of interest is an area of higher resolution. It can be created by several options, similar to the domain and the shoreline:
In this example an area of interest will be drawn on the map by taking the following steps:
- Go to the Area of Interest section and click on the button
- Click a polygon.
- End the Area of Interest by double clicking. The area of interest is allowed to overlap with the shoreline and/or the edge of the domain.
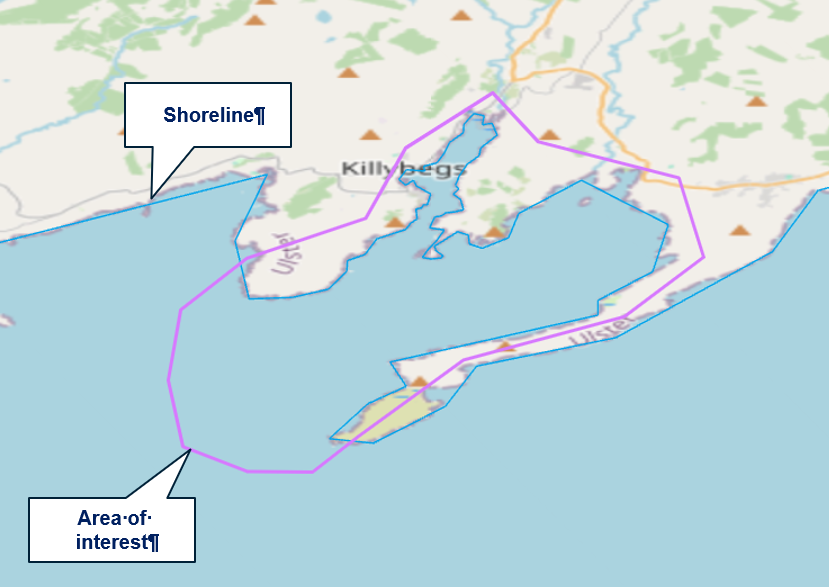
Definition of the area of interest by hand drawing on the map.
- The area of interest can be deleted after which a new area of interest can be created or uploaded.
- The maximum edge length of the mesh in the area of interest can adjusted from the default. Click on
 and adjust the maximum edge length from 300 to 500 and submit the change.

Upload bathymetry
By default, GEBCO bathymetry is provided by MIKE MS via MIKE DataLink. The user has the option to upload additional bathymetry in the form of a space separated .xyz file.
An example format for the bathymetry data is provided below. This text can be copied to a text file and saved as fake_bathymetry_data.xyz:
-8.507639 54.577773 -50.00
-8.504510 54.578484 -50.00
-8.503373 54.575213 -50.00
-8.507212 54.573648 -50.00
The bathymetry xyz file can be uploaded from the desktop by clicking the button under the Bathymetry subsection:
The properties of the xyz file need to be provided during upload.

Bathymetry data points shown in the interface (using Fake_bathymetry_data.xyz).
The uploaded bathymetry will be prioritised by default, but it can be moved up and down the priority list by the user. The highest priority data will be used for interpolation of the mesh while any other lower priority data will be ignored where it is overlapped by the higher priority data.
Prioritisation of bathymetry data.
Create mesh
The Create Mesh button will become active after the domain, GEBCO bathymetry, shoreline and area of interest has been uploaded, converted and shows a completed status ![]() . Pay attention to the status of these items.
. Pay attention to the status of these items.

When all the statuses show completed, “Create mesh” can be clicked:
The mesh is generated using a density function based on the seabed level from the GEBCO data. The density function placed higher resolution mesh in shallower water.
WARNING: If the shoreline is longer than the offshore boundary, then the mesh will be created on land. The user may have to invert the mesh.

Mesh incorrectly created on the land side. User must invert the mesh.
If the user selects “Invert mesh” and regenerates the mesh, then the correct mesh will be displayed.

Mesh incorrectly created on the land side. User have inverted the mesh.
WARNING: If the mesh is created before the GEBCO bathymetry is available, then a pop-up message will warn the user to wait a bit longer before creating the mesh.

Interpolate mesh to bathymetry
The mesh is interpolated to the bathymetry files when clicking Interpolate.
The user will see the interpolated mesh in the map as shown in the figure below.
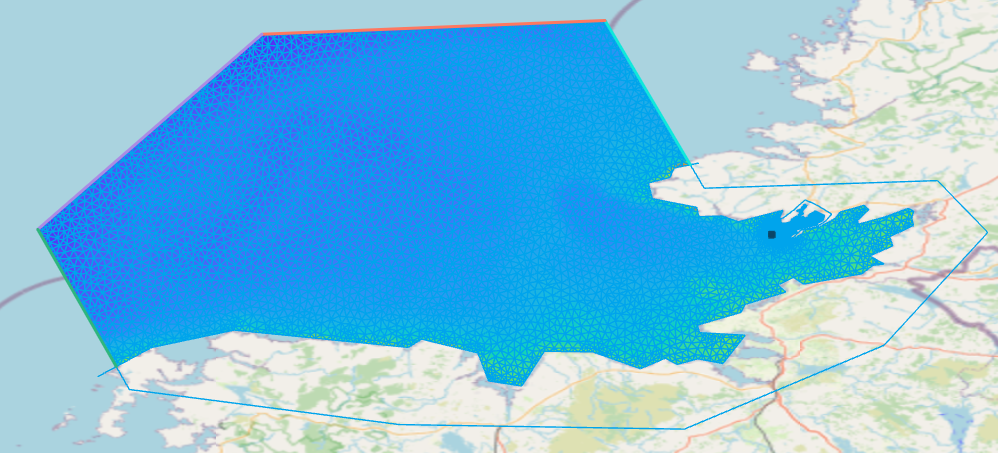
Mesh file interpolated to the bathymetry files
Click Next step to continue.